
Deviled Eggs. A classic for a reason!
People love them and they are pretty much ubiquitous at any potluck or picnic held across the nation.
Honestly I can’t believe it took me this long to post a version since I’ve been doing low carb for a couple of months already!
And I didn’t even think of them until the other day when it hit me that I hadn’t made them in awhile.
My biggest issue with making them is peeling the eggs. It’s a pain in the you know what. So before I tackled this batch I did a little online research on how to keep the peels from sticking. I found a couple of suggestions.
First one said “use old eggs” which is A) disgusting, and B) impossible because we go through several dozen a week and they don’t hang around in my fridge long enough to get “old.”
The second suggestion I found said to start them in cold water, bring to a boil for one minute and then turn off the heat and cover them for 20 minutes. That’s what I did. They stuck like a son of a gun.
However, after I cracked them a good one against the counter and ran them under cold water for about 10 seconds each I had good results getting the skins off – still a few dents but overall ok.
I will say that this method produced perfectly cooked eggs, perfectly centered yolks, and no nasty green layer between the yolks and the whites.
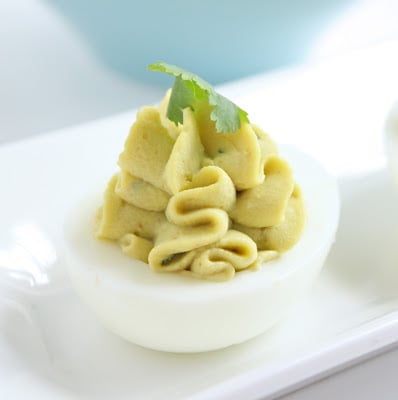
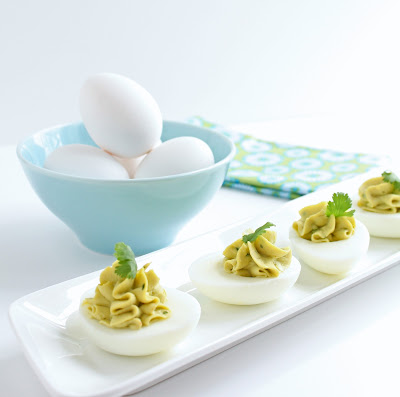
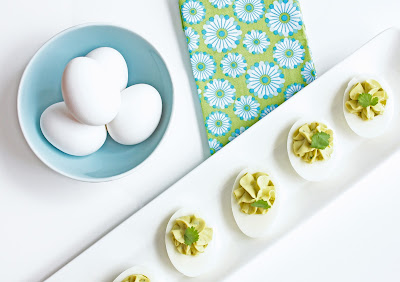
Why do my eggs look green then you ask??? Because I added mashed avocado, lime juice and cilantro to the yolks along with the classic mayo. Delicious! A hint of tang from the lime juice, and so creamy from the avocado – these really work!

Guacamole Inspired Deviled Eggs
- Yield: 24 halves 1x
Ingredients
- 12 large eggs
- 1 ripe hass avocado, peeled & pitted
- 6 Tbsp mayonnaise
- 1 lime, juiced
- 1 Tbsp chopped cilantro
- 3/4 tsp kosher salt
- 1/4 tsp cumin
- 1/2 tsp cayenne pepper
Instructions
- First cook, cool and peel your eggs.
- Cut them in half and gently remove the yolks, placing them in a medium bowl. Add the avocado and mash together with a fork.
- Once combined, add the rest of the ingredients and mix well until mostly smooth.
- Add the filling to a pastry bag fit with a star tube, or put it into a quart sized freezer bag (when ready to fill you just cut off the corner and squeeze into whites). At this point you can store the filling and whites separately in the fridge until ready to serve (if using for guests or bringing to a potluck gathering).
- If serving immediately, set your whites on a plate or platter and pipe your filling into them. If desired, garnish with fresh cilantro and/or a sprinkle of paprika or cayenne pepper.
- Category: Appetizer
- Cuisine: Eggs
Nutrition
- Serving Size: 1 deviled egg
- Calories: 74
- Fat: 7g
- Carbohydrates: 1g/ .5g net
- Fiber: .5g
- Protein: 3g
A fun new take on the classic! Hope you like them! Got a secret to perfectly cooked hard boiled eggs that peel easily??? Please, please, PLEASE have a heart and share with the rest of us!!!!


Jessica says
Love deviled eggs? Love guacamole? If you answered yes, this one’s a no brainer! Such a great twist on deviled eggs (which are a keto must in my book!).
Charissa says
Perfect hard-boiled eggs, easy to peel every time? Instant Pot. 5 minutes, then natural release 5 minutes. Perfect. I plunge in cold water too, but I don’t think you have to.
Before the Instant Pot, I placed eggs in water, brought to boil, turned off heat, let cook for 15 minutes, then plunged in ice cold water. That did the trick 85% of the time. If they’re giving me a hard time, I run under cold water while peeling.
My sister-in-law swears by the baking soda trick and she brings dozens of deviled eggs to every family gathering. I haven’t tried it, though.
Eleanor says
Is the calorie count 74 for two halves or one half?
Ashley Abney says
I’ve tried every suggested way to make perfect hard boiled eggs where the peel won’t stick… even baking and none worked.
I FINALLY a few months ago discovered the perfect cooking method and it’s been a breeze since.
The key to perfect boiled eggs, even with sort fresh eggs… is to bring water to a boil BEFORE adding the eggs. Boil the water… gently add the eggs and let it low simmer/boil for 15 min.
Take them out and put them in cold/ice water ideally… but cold works fine for me. Crack them all around and the peels literally fall right off on every single egg!! The eggs also have three perfect doneness and and yellow yolks.
Try it!! It works every time!
Ashley says
Steam the eggs! You won’t be disappointed.
Deborah says
Put the eggs in the pot with cold water and add 1/2 teaspoon of salt. When the eggs are done pour out the boiling water and add cold water and let eggs sit for a couple of minutes. Then turn on the cold water at the faucet and crack the eggs really good and peel them from under the running water. The peels slip off really well. Hope this helps!
Deborah
Fallout Guerrilla says
Super late to the party… I use baking soda (a lot) and its (theoretically) supposed to dissolve the shells.
Great job though, just started a low carb diet and have been getting bored with scrambled/fried/hard or soft boiled/omelets etc… very excited about all the things here.
Mellissa Sevigny says
Thanks FG! Hope you enjoy the recipes! I have yet to try the baking soda trick, will have to test it out next time I make them!
Doris says
Hi Melissa,
I finally did this recipe and it was a HUGE hit with people! Love the cumin in it.
Here are some things I learned regarding making deviled eggs. Today is the first time I have successfully peeled hard-boiled eggs and a bit more simplistic approach or a different way to make them.
Here is the way to successfully boil the eggs and peel them, which is about the shortest amount of time and work compared to some of the suggestions.
So, basically, this is what you do:
1. Put your eggs in a pot, only 1 layer of eggs. Do not put eggs on top of eggs.
2. Fill the pot with water (not hot, just room temp) until it covers the eggs and a little more.
3. Add some salt to the water. (I watched another video that said to add some white distilled vinegar, but I did not do this)
4. On medium high heat, bring the water to a rapid boil.
5. Once it reaches a rapid boil, set the timer to boil at this heat for 2 min.
6. Remove the pot from the burner and put a lid to cover it for 10-15 min.
7. Drain water and add cold water to it. You can rinse the eggs with cold water from the tap a couple times, but I only did it once, as I was a bit lazy.
8. Leave some water in the pot with the eggs in it and put some ice to the water.
9. Let the eggs, water and ice sit for a few minutes. I didn’t wait a few minutes as I was impatient and the eggs peeled just fine.
10. Remove one egg at a time to peel.
11. Gently crack around the width of the egg all around. This makes it easier to peel in one piece. I found when you only cracked one side, it’s harder to peel.
I honestly didn’t want to use a fork to mash the yolks. I just threw all the ingredients in a food process, including NOT chopping the cilantro and just pulse mixed them until it was creamy. I didn’t use a quart sized baggy, rather a sandwich baggy and all this fit into there. No point in wasting that big of a baggy. I just snipped the end and piped it into the egg whites.
I was thinking about instead of using cayenne pepper next time, that I might replace it with a chipotle pepper powder (basically you take a dried chipotle pepper, grind it up in a coffee grinder). That will give it also a spicy flavor, but a smokey flavor, too.
Anyway, I’ll make this recipe again and try it with the chipotle. Yum!
Thanks for another hit recipe, Melissa.
Mellissa Sevigny (sevimel) says
Thanks Doris, glad you liked this one and I love the chipotle idea too! Thanks so much for sharing your egg method with the rest of us! I just tried it using salt in the water and they peeled pretty easily so I guess it works!
Candace says
I always crack the eggs and then roll them on the counter, applying a small amount of pressure while rolling. This always seems to release the filmy membrane that clings to the inside of the shell, from the rest of the egg. At least for me anyway. Most times with this method, I can get the entire shell off with one peel. Also making sure that they are completely cooled before peeling helps.
Also wanted to say that I love your blog. Have pinned quite a bit so that I can come back and remember all of these amazing recipes since I just started my low carb diet.
Mellissa Sevigny (sevimel) says
Thanks so much Candace! I hope your low carb endeavors turn out well and that the recipes help you stay on track. I will try the rolling on the counter trick – it totally makes sense that it would work!
Amber says
Does the avocado in these start to turn brown after while? Wondering if this is something I could easily make ahead for events without worry of the avocado mixed in turning brownish like it always does for guacamole. Sorry if it’s a repeat question. I did scan the above comments to see if anyone asked, but I didn’t find it, but could have easily missed it.
Mellissa Sevigny (sevimel) says
Hey Amber! I had these in the fridge for 3 days with no discoloration but I can’t say how much longer they’d keep because I didn’t try it. The lime juice in the recipe keeps the avocado from oxidizing and turning brown though so you should be good to go if you are only making them a day or two ahead. Hope you like them!
Amber says
Thanks! Yes, I would only want to make them maybe a day or so in advance. It’s also a great idea for using up a leftover half of an avocado. I use it on sandwiches a lot, and trying to keep it from going brown was impossible, so now I can make some of these. Have you tried the trick of baking the eggs vs hard-boiling them? You can bake them at 325-350 degrees for 20-30 minutes in the oven, right on the center rack, then immediately submerge them in ice water and peel once completely cooled. I did this recently, and it worked really well. Even the ones I didn’t peel right away peeled nicely later after being the fridge. Just make sure to put a cookie pan or something under the eggs on the rack just in case one breaks. I did mine in muffin tins, but that left some brown spots on the outside. So maybe straight on the rack would be better. Just something to consider trying :)
Mellissa Sevigny (sevimel) says
Hope you like these Amber! Thanks for the baking tip, never tried that one either but it sounds like an interesting experiment. I have a silicone muffin pan and I wonder if that would work without the brown spots. Will try it on my next batch and report back! Thanks!
Janknitz says
I learned a new way of hard boiling eggs and the shells practically jump off the eggs! I place them in a steamer basket over cold water, turn on the stove and leave it exactly 20 minutes. Then transfer the eggs to a cold water bath. Once they are cool enough to handle, they peel like a dream.
Can’t wait to try this recipe–eggs and avocado go together like chocolate and peanutbutter!
Mellissa Sevigny (sevimel) says
Thanks Jan! I hope you like them!
Cool Design Shelties says
Looks yummy. Have to try them and thanks for the nutrition info (especially calorie content ♥) :-)
Mellissa Sevigny (sevimel) says
Hope you like them! Glad you’re appreciating the nutrition info! I’m going to try to make it a regular feature though I’ve been resisting for months because I hate Math and it’s a pain to calculate! :)
Matt Sevigny says
These were great..almost as good as the regular ones you make. Keep up the good work! You’re a keeper!
Mellissa Sevigny (sevimel) says
I’m actually impressed that you ate these – your palate’s come a long way in 18 years! Plus you’re kinda sweet so I guess I’ll keep you too! ;)
Mellissa Sevigny (sevimel) says
Someone on reddit shared this link (http://www.hippressurecooking.com/2011/04/hip-modernist-soft-medium-and-hard.html) for using a pressure cooker and they even have a chart for how long and what pressure depending on hard or soft boiled! It’s pretty cool – they explain why it works and it makes complete sense! Totally trying this next time!
halcyonsting says
When they’re boiled, I do the cold water thing first, then pop them into the freezer for fifteen-twenty minutes. Always works.
Thanks for this recipe, it looks dangerously delicious. :)
Mellissa Sevigny (sevimel) says
The freezer is a great idea because I never have the patience to wait for them to cool! Thanks for sharing!
Jasmina says
I run the eggs under cold water immediately after they are done, then I let them cool a bit before rolling them on the counter and breaking the whole shell before trying to peel it off. That works great for me!
I’ve also heard you should just let them go completey cold and then peel them, but I haven’t tried this myself.
Mellissa Sevigny (sevimel) says
Running them under cold water made a huge difference for me too – when they are still warm I have the hardest time getting the peel off and they get mangled!
ky.breanne says
Hi Melissa! I’m a new follower to your blog after seeing your cream cheese pancakes on pinterest! These deviled eggs look DELICIOUS! As for the hard boiled eggs? Try salt! My mom always taught me to put in a bunch of salt right after putting the eggs in the water. The shells just slide off! (not just a couple tablespoons from a salt shaker…haha…more like 4-5 generous shakes from the actual salt container). I hope this helps!!
Mellissa Sevigny (sevimel) says
Thanks Breanne – I’ll definitely try out the salt trick! Welcome to IBIH! :)
Jude says
I’ll have to try that salt thing. The one I use is to take the eggs immediately from the hot water to icy cold water. It works when I actually do it, but the salt technique looks a lot more my style.
Anonymous says
Also the older the eggs the better the shell comes off…so like a week after you buy them boil them… Look at me! I retained some info from culinary school after all! ;-p
Mellissa Sevigny (sevimel) says
Thanks for sharing all of your techniques guys – now none of us have an excuse for hard to peel eggs! Guess I’ll be making them more often from her on out!
Patty says
I admit, I’ve never met a deviled egg I didn’t like, but these are at the top of the list…maybe a few crumbles of bacon on top, or would that just be too much?
Mellissa Sevigny (sevimel) says
Patty, Patty, Patty….bacon is NEVER too much! In fact I shivered a little when I read your comment! Can’t believe I didn’t think of it myself! Thanks for the idea!!!